Chase Yourself Project
For this project, I've been asked, by my VFX teacher, to film a short film. The project is called "Chase Yourself".
See "Chase Yourself Documents" Blog for evidence of the Tasks done.
In this project, the film is about you chasing yourself. And I'd like to think of this is a way of testing our knowledge in filming, composition & editing.
Task 1 - Pre-Production Documents
Pre-Production is a way of planning your short film, before actually filming it. These consists of;
- Treatment Plan- A way of setting out, what your short film will be like, who'll be featured in it, the basic plot, who's the targeted audience etc,
- Gantt Chart - A sheet to schedule each section of a project. For example you fill in with blocks when you'll be filming etc.,
- Location Scouting - Is essential when filming. You must find & research an area suitable for your film & write the pros & cons of said location & do a risk assessment of the location to ensure that it is safe to film.
- Shot List- A document which lists each shot in your storyboard, describing the camera angle, shot type & the details of what happens in the shot.
- Storyboards- Storyboards are a really good way to layout which happens in each shot, by drawing them. You also have to list the shot number and describe how the camera will move as well if there's any camera movement in each shot.
The treatment plan helped set out what I was going to do with the film. The storyboarding took a bit of a while to do as I hit a block in the middle of the story. However, I was able to find an ending which worked for me, though was a bit different to what I had in mind. The Gantt chart was a bit weird as I didn't really understand what a Gantt chart did, so I did my best to utilise the Gantt chart as much as I could but due to the fact I had COVID for two weeks the Gantt chart didn't really help me.
However the location scouting and risk assessment was easier to do and I did do a bit of extra location scouting and I was able to do add bit more research to my location scouting, as well.
The Storyboard went okay, for the most part. I was able to illustrate the majority of my shots, and many of them are present in the actual film. In my storyboard, I've also illustrated some of the camera movements as well using a red pen. Since my film has a bit of dialogue at the end of the film; I've made a small script;
What I've also done is, type up a shot list to set each of my scenes so I had a clearer idea on what I needed to film, how the camera angle's going to be, what the character's doing in each shot etc.,. It allowed me to set the scene even more.
The location scouting was a bit of a hit & miss, as I didn't manage my time a bit. However, I managed to find a location much suitable, Queen's Park, Loughborough. The park was clean, not too crowded & was a lot of space to film the scenes. It was easier for the actor to come in as well since he lives in the Leicestershire-area.
I've also made notes about this in my location scouting sheet. Like I've mentioned, I've done some extra location scouting during my spare time & I've written the pros & cons of the location.Fortunately, due to how open, clean & peaceful the park was, there was no other hazards I could write about in my Risk Assessment sheet. And the clean open spaces around the area helped me & the actor to film peacefully.
In my experience the pre production documents took a bit of a while to do because I wasn't able to figure out what my story for my film is going to be like. Originally I intended to make my short film a thriller however I decided that that was going that was not going to work so I decided to make it have a bit of a light-hearted ending and have a story that the main character drops a wallet and it's somewhere in the park and the doppelganger finds it & gives it back to him.
Task 2 Production
So with all the pre-production documents out of the way I was able to start filming. However, I had COVID and I had to self isolate for 2-weeks. So after the long wait I decided to begin filming In the first day I was able to come back in campus. I did enjoy it but unfortunately had to reshoot the majority of my shots as some of them were out of focus. And we were going to film on Saturday on the same week however, scheduling issues happened thanks to my parents and I wasn't able to film on Saturday so we decided to film on Monday on the coming week and I was able to get all of my shots done and filmed. I had to film several takes for some of the scenes
Task 3 - Post Production
When it came to fully editing the film, it wasn't a very difficult process at all. I've learnt all the basics of editing & masking in Premiere Pro so, it wasn't a huge task.
Due to me having COVID for two weeks, my VFX teacher gave me an extension so my deadline is due in on February the 9th so, that gave me some time to edit my short film very quickly but I didn't rush the editing process. I took my time but I did want to make sure that I want to get it out as soon as I could so I could save some time to write up this evaluation. I was able to get the majority of the music tracks and sound I needed for my film and overall the editing process went really well. I also learnt how to use this text message effect/edit because in one of the scenes of my main character actually texts his to his Mum when he'll be back and I utilised this tutorial from YouTube which I'll leave a link but, I'll also explain how I did it too: Text Message Edit in Premiere Pro
For the masking shot two shots needed to be filmed, it was a case of filming the footage twice. In my case, my masking shot was the protagonist hiding behind a building and the chaser from afar looking for the protagonist.
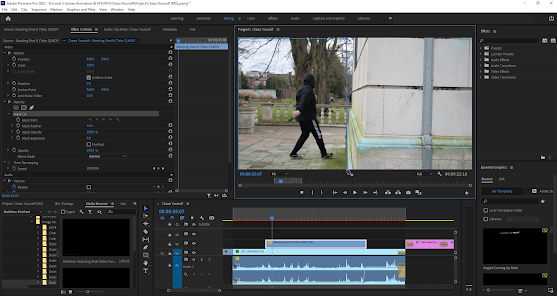
I filmed the protagonist hiding from the Chaser behind the wall, and keeping a lookout. I then record another shot. Only this time, with the chaser looking for the protagonist. For a masking shot you need to make sure that you don't move the camera. This is so that when you apply it, the seams between two shots aren't visible & give the effect away. I used this tutorial here. But, I'll also explain how I did it. In Premiere Pro, make sure you've got two of your shots on top of each other like this;
The chaser's clip is at the top and the protagonist hiding clip is at the bottom. I've selected the top clip above & used the "Free draw Bezier" tool, under the Opacity tab in the Effect Controls panel to draw around the subject.
 |
Simple use the "Free draw" tool to draw around your subject and it one of the corners you've placed before. Then the masking effect should take place.
|
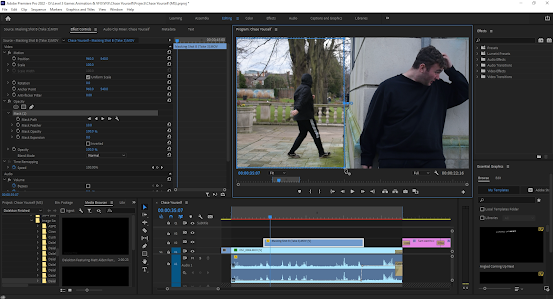 |
| Here is what the mask should look like |
I then do a little bit of colour correction, as the shot with the chaser coming in, was a bit bright due to the weather. For this, I used the colour balance effect, and using the "Midtone Blue Balance" I set it to 10, and set the "Highlight Red Balance" to -16. Though you can still see the difference in the colour correction taken place, I think it was not a bad attempt at colour correcting the two different shots and I'm fairly happy with the results.
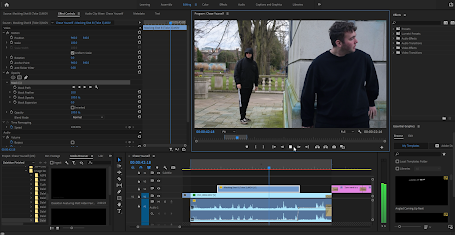 |
| Before applying Colour Correction |
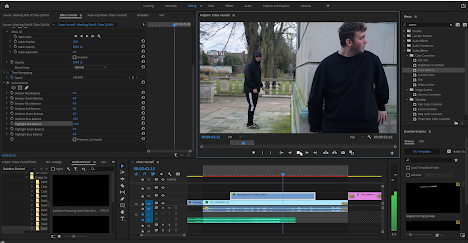 |
| After applying Colour Correction |
Here's a video on how I did the masking shot, and applied the colour correction;
I'll now talk about, how I added the Text Message effect as seen here;
This was done by downloading a couple of text bubbles from the tutorial;
As they were PNG files, importing them into Premiere wasn't a difficult task. What I then did, was animate them so that they appear as if you would receive a pop-up notification on your phone.
This was done by doing some keyframing animation at the start (from when the text bubble appears). I added the first keyframe to set things off, then I drag the playhead to a couple more frames and add another keyframe. This time, I increased the scale of the text bubble to 160. Then, I made a third keyframe, scaling the text bubble down to 150. To give it that bounce effect. Next, I went back to the second keyframe, right clicked it, and changed the keyframe to "Bezier" this can smooth the animation a bit. I then changed the opacity of the text bubble a little bit.
Then, I add in a text layer, and drag it in to the text bubble. I then use a Cross Dissolve effect, to make the text appear like it's typing.
Evaluation
After exporting the short film I decided to give it a good watch and I'd say my film was a success. It had everything what I wanted. Overall my short film was mostly everything I wanted it to it was really well and I was able to to able to express my story vividly and through the film which I'm really happy with.
When I uploaded my film on Teams, I had to upload it the next day of the actual deadline for the rest of the class (I had an extension) but, I never really received any feedback from my peers which I was really disappointed about. However,
If I were to do this project next time, I'd manage my time a bit more carefully with doing the pre-production documents (specifically the location scouting sheet).


Comments
Post a Comment