Non-Lethal Weapon Project
Our teacher has instructed us to make a non-lethal weapon. It can be anything we can think of, as long as it doesn't cause harm. I've decided to go with a gun which dispenses milkshakes.
Task 1: My Ideas & Inspiration (Concept Art, Moodboards etc.,)
When beginning this project, I've had several ideas before but they didn't feel generic to me. But, I've found my idea whilst browsing through Sketchfab. I saw a post of a 3d model called "The Espresso Gun".
The user made it for a very similar project, but it was a challenge instead of an actual assignment. Never the less, I took inspiration of that model & began thinking about a potential "Hot Chocolate Gun". However, I recognised that hot drinks can cause harm because of the high temperatures, it can burn on the skin & such. So, I decided to go with a Milkshake Gun instead.
Another form of inspiration which enabled me to go forward with the "Milkshake Gun" idea was when I re-watched The Founder (2016). The Founder was a movie about how the famous fast-food chain, McDonald's was founded. In the film, they used a machine called "Multimixer" to make their milkshakes and the shape & design of the machine is what I based my design on.
I thought of this idea as more of a tool than a weapon used in battle.
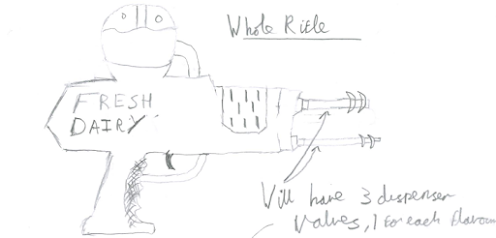
Either way, I was really happy with that idea so, I moved forward with it. Starting some concept designs. First on paper & annotating which sections of my design will have what function, and doing a turnaround page in Photoshop.
The overall shape resembled a water-gun which was what I was going for. As you can see, my concept design has three prongs at the end which I called "Dispenser Valves". Each "Dispenser Valve" will dispense one flavour of Milkshake; Strawberry, Chocolate & Vanilla. The main idea of how I wanted the milkshake to dispense was whichever Dispenser Valve was at the top, would be the active one to dispense the milkshake.
After, I finished my rough sketches I made a turnaround of my design in Photoshop;
 |
| Milkshake Gun Turnaround, done in Photoshop. |
After I've finished my turnaround, it's time to 3d model. But, first I needed to grab some reference images & make a moodboard.Task 2: Moodboard
I've gathered several images & 3d renders of 50s vending machines & coffee machines (and images of the Multimixer of course) and pasted them in PowerPoint. I wanted to capture this pastel colour with metal platings & such.
As you can see in the reference images above, retro 50s machine consisted of metal parts but with a plastic coating & a pastel colour. This was used so I can convey how my Milkshake Gun was going to be coloured (textured).
After getting all of my concept drawings finished & when I'm fully assured what my model's going to look like, it was time to 3d model.
Task 3: 3D Modelling & Texturing
For the reference images of my Milkshake Gun model, I didn't use references of a standard gun, due to my gun being such a specific design. Which is why I made the turnaround in Photoshop. I used the Snipping Tool to screenshot the relevant sides (Front, Side & Top) and made them into separate image files. I imported them into Blender & began modelling.
I began by scaling a cube mesh and started from the handle. Then, by extruding the top edges. When I reached the top of the handle, I used the proportional editor, switched the setting to "sphere", and began moving the vertices on the right to give it that curvature as it moves along the barrel of a gun. Once I managed to reach the top of the handle, I extruded the top edge and extruded it again to form the body of the gun. I made a loop cut, selected the top vertices of that loop-cut and moved it down to form that dip by the end of the barrel. Once all that's done it was time to model the "Dispenser Valves". These were simply done by scaling and extruding several cylinder meshes. The trigger was done by scaling down another cube mesh and extruding & scaling the mesh to make it look right.
I wanted to add a plating to the sides of the gun as metal-platings were present 50s style machines and such. So, I duplicated the body of the gun, and made 2 edge loops so they're at the top and bottom of the plating. Then, I added a series of loopcuts & moving the top & bottom vertices so that they were in line with the shape of what my metal plating looked like. I've double tapped "G" so that the vertices were at a specific axis and don't deform.
Here is what my model looks like after finishing it;
I wanted to pay homage to the original Multimixer machine by adding their logo. Since this
project wasn't for commercial use, I was allowed to do it. However, I needed to find the right font that the makers of the Multimixer machine used to make it.
 |
| Original Multimixer Logo |
I looked everywhere online and couldn't find it. So, I decided to ask a forum where people are an expert in finding specific fonts. Only to then tell me that texts like the one in the Multimixer logo would've been drawn by the designer and would be handmade. There were alternatives however like the "Miedinger" font or the "Deco Wide" font but, those costed money. So, I looked for free alternatives instead and found the "911 Porscha" font. This was perfect and the fact that it's a Porsche-type font, it would give the model a certain, futuristic tone to it.
So, how I added the "Multimixer" was simple. I've added a text box in Blender, typed in "Multimixer" and changed the font to "911 Porscha".
I converted the text box into a mesh (right click > convert to > mesh) and scaled it down. What I, then did is set the origin to the mesh's geometry.
I then scaled it down so it fitted right in to where I wanted the logo to fit. Then I added a Solidify modifier, to give it some depth and some thickness. Then I placed it on the plating like this. And I rotated it so it it's in line with the angle of the gun.
Also, for some added detail, I used a Bezier Curve, increased the depth a little bit & made it into a small cable by scaling & extruding the points. I then, converted the Bezier Curve into a mesh by right clicking > Convert to > Mesh, I scaled the text down and move it where I wanted the logo to be, on the plating, like this;
For this task, I made a low-poly version of the gun, duplicated the meshes (Gun body, the trigger & the barrell) and added a SubSurf Modifier. A SubSurf modifier helps to smooth meshes and adds extra vertices, meaning more polygons. When I applied the SubSurf modifer, it deformed my meshes entirely. However by making extra loop cuts and bringing them very tightly close to the original edges of the mesh, can help it keep shape. After doing that, I've applied the SubSurf modifiers.
Then UV Unwrapping was the next stage. UV Unwrapping wasn't a difficult task, surprisingly. It was packing all the UV meshes which was the issue. I UV unwrapped the low-poly Milkshake Gun model, instead of my high-poly (We can bake the high poly onto the low-poly. More on that later). Here's my progress on UV unwrapping;
After UV Unwrapping every single one of my meshes, I attempted to manually pack all of my UV Islands. Unfortunately some of the islands were not scaled right and that can affect how the textures can be displayed. So, I decided to hit the "Pack Islands" button, which Blender automatically packs the islands for you, and decided to export both my low poly & high poly version of my model as an .fbx file.
 |
| UV Islands of my Milkshake Gun model packed |
Once all of the UV Unwrapping's finished, it's time to texture the gun model. I, opened up Substance Painter and, like what I've mentioned in the "Sculpting in Blender" Blog, I press, "File>New" & select the "PBR - Metallic Roughness (algorithmic)" template, then I select the low-poly mesh of my gun model. This is done by clicking on "select" and I find the .fbx file of my low poly mesh & set the resolution to "2048". Then, I hit "OK". There was a problem however. When I ported the low-poly mesh to Substance, all the faces were transparent and you could see the inside;
After doing some research online, I found out that the normals of my mesh were inverted. So, I had to go back to Blender select the low-poly mesh (in Blender) and press "Shift+N" to recalculate the normals. This fixed my issue.
After importing my low-poly mesh to Substance Painter, with the normals correctly assigned, it was time to texture my model.
 |
| This is what the low-poly ver. of my gun looks like in substance |
But firstly, I needed to bake my high-poly model onto my lower poly mesh. We can do that by going into the "Texture Set Settings" tab & scrolling down until you find a button called "Bake Mesh Maps". A pop-up window will appear.
Clicking on the little file icon on the right (on the same area where it says "High Definition Meshes") will pop up your libraries window. From there, you can find where you saved your .fbx file of your High Poly mesh. I've set the resolution to "2048" (the same resolution I've set to the low-poly mesh) and once all that's done, I've clicked "Bake Selected Textures". The Baking process will appear & the high poly version of the Milkshake Gun has been baked on to the low-poly.  |
| High Poly ver. of the mesh baked on to the low-poly |
Now, it's time to texture. Texturing was an experiment in itself. The process was simple though. I've added a fill layer (probably best to change the colour of it so you can see the changes take effect later in the process), created a folder in the "Layers" tab and dragged the fill layer to the folder. Then, I selected the folder and added a "black mask" layer. What this can do is you can select which part of your mesh you want to texture. To do this, select your "black mask" layer, and go on to "Poly-Select" Tool. Then, make sure to click on "mesh fill" at the top and click on a section of your mesh. You should see the selected mesh painted to which ever colour you made it. Here's a video demonstration. All of the layers were made from scratch, no pre-made materials were used. I wanted to test if I could replicate the materials seen in 50s vending machines, the Multimixer machine etc.,
I've repeated this process for the metal plating on the sides of the gun, the barrel the trigger and the other parts of the gun. I find this a more efficient way of texturing your models as you're not painting the entire UV layout & I find it very enjoyable.
For the metal platings and the sides of the gun, I adjusted the roughness slider & the metallic slider to get acceptable results. What I wanted to go for was a reflective, shiny but slightly cloudy look. The reflective surfaces will be kept but it won't act like a mirror. Here's a picture to convey what I mean;
It's still a metallic, shiny surface but the reflections don't show as crisp, like a mirror. I'll post some reference imagery to show what I'm trying to convey;
Texturing the main body of the gun was an interesting challenge. Like before, I masked the main body of the gun like this, the main body of the gun selected;
I then changed the colour of the fill layer to a darker red, and adjusted the roughness slider & a little of the metallic slider. The roughness slider was set to "0.0491" giving it a I wanted to replicate the plastic-y coating which the machines had at the time.
 |
50s food machines had that style plastic coated bodies
with pastel or vibrant (in this case red) & shiny areas but don't reflect well. |
A similar thing has been done for the actual barrel & the dispenser valves. What I originally had in mind was to texture each of the "Dispenser Valves" individually so it could show which flavour the Valve would dispense. But due to the time frame getting shorter, I was unable to do it.
The trigger & the cable at the top were coloured in black and I just turned the roughness slider to "0.4591". That way, it's this matte texture but it's not too intense.
After all the texturing has been done, this is how I organised my layers before I exported the textures;
Task 4: Animation
Animating the gun was done by moving a part of my mesh & keyframing it . For example, when I rotated the Dispenser Valves to rotate, I first make a keyframe (I > Location, Rotation & Scale, and it can mark a keyframe in the timeline) to mark it's original position, rotate it on it's X axis (that's where the dispenser valves are facing), and rotate it to 120 degrees, clockwise. Then, I animated the trigger by moving it's mesh and rotating it to the Y axis to a certain degree and moving the mesh up to it's Z Axis. The animation is shown in the recording below;
Unfortunately, I wasn't able to render it.
Evaluation
Overall, this project went really well for me, even if I had some difficulties gathering ideas from the start. I'm super grateful that, I've rewatched The Founder (2016), as that's where the main drive for my idea came from. The final model looks really great and I'm really happy with how it looks, currently. However, there were some changes which I came across during the process of modelling this.
In my initial concept designs for my Milkshake Gun, I added the phrase "Fresh Dairy", but it seemed very clichéd and that was the reason for the change from that to using the "Multimixer" logo.
Another change which had been made is that the grill at the end of the barrell is not present in the model. This was due to the fact that the time frame kept getting smaller as the deadline kept coming closer.
However on the other hand, to go with the 50s vibe, I decided to add the metal platings which where present back in 50s machines.
Another change, though an un-intentional one, is that the handle in the final model, doesn't have a textured, rubbered grip. This was left out, as the time frame kept getting shorter and shorter.
And one final change was that the textured "Dispenser Valves" which were meant to display each individual flavour, that was also left out because of the time frame.
If I were to do this project again, with the same idea & with more efficient prioritising, I would've gone through the effort of individually, texturing the dispenser valves and adding that grill on the top, on the barrel of the gun. I would've also added a handle grip, so that people could grip the Milkshake Gun properly when in use.
Never the less, I'm fairly happy with how the Milkshake Gun looks.
Here's a proper 3d render of my Milkshake Gun.


Comments
Post a Comment