3D Animation
(Learning How to Rig a Model Pt 1)
Our main teacher for this course returned after his absence from illness (wishing him the best recovery!) and he'll be teaching how to rig a model in Blender. However before doing that he set us a fun & entertaining yet slightly stressful task which was to get into partners & draw each other standing & sitting down. We also had to draw as best as we could, too. The only catch was, Our teacher timed us three times for each person drawing. The first try was 10 minutes, then the second was 5 minute, and the third try was 1 minute. However there's a reason why we had to this drawing exercise. I'll explain later after talking about my each drawings.

Our teacher also mentioned to draw a stick figure like armature so the basic shape & pose of the subject is on paper & you can worry about the other details later such as limb shapes, clothing etc., . When you've got the basic proportions and the armature done, you can then block them out and draw a more proper body so, it's a little more realistic.
For my 2nd try in the 10 minute time frame, I've had to use that method but with only on exception, the subject is sitting down. Which is a bit more harder to draw;
As you can see, some bits of the armature are visible such as the head, the lower body & the legs. This was a way to scale our subject in a more efficient manner. However it may be a little more time consuming for people who are beginning to use this method as it can be a bit tiring on the arm you're holding up to scale. And a bit time consuming too but, it does work.
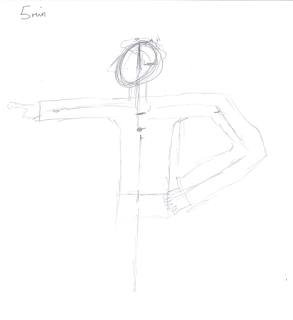
Now, the pressure is on...the time frame is five minutes and we've (me & the partner I worked with) have to draw each other using the method our teacher showed us.
My partner, the subject who I'm drawing did a "Revolution" pose and I've had to implement the same drawing method. Overall, it went okay but due to the 5 minute time frame i was unable to complete it from head to toe. I'm afraid though, this is a little bit of a failure as the proportions are a little wonky still.
Now, the "real fun" begins...I've had to draw my partner sitting down and it was also a nightmare! I decided to move to a different area of the classroom to get a better perspective of the subject (my partner) sitting down.
Overall, the drawing was okay-bad. The drawing was at a high angle and the legs looked disproportionate. However, on the bright side, the proportions were slightly decent at the upper torso area and you can see, I managed to get the overall armature of the model.
The real challenge arrives, the one minute time frame. Spoiler; I didn't manage to draw everything in that time frame.
During the one minute frame, I've had to quickly scale & draw the armature. I didn't have enough time to accurately draw the overall proportions of the subject's body so, the drawing above was the best that I could do.
When I had to draw the subject in a "squatting" pose, due to the 1 minute time frame, I couldn't draw the whole thing so, I did the armature. Overall, I've got the proportions of the subject in the armature.
(Learning How to Rig a Model Pt 2)
So, after learning about, body proportions and armatures, this week we've learnt how to rig a model from scratch in Blender & how to animate it. Before we started to rig, we've learned about the two different kinematics in rigging. Forward Kinematics & Inverse Kinematics.
Forward Kinematic is where you move each bone, one by one, like a robotic arm but it can make animation seem a bit robotic & un-natural. Inverse Kinematics is when you move one bone, let's say a bone at the hand, the following bones move along with it. Example:
Inverse Kinematic rigs work & move more naturally, it can make animations, at least in my experience, a tad more easier to do.
To make a rig in Blender, firstly, we opened up Blender & our tutor showed us how to add a bone. The hotkey is Shift + A > Armature. This will add a single bone to the viewport.
You can extend the bone to form another one, forming the end of the previous one like this:
Simply go into Edit Mode, and click on either joint of the bone and press E to extrude, and you've made a second bone which is joint to the first. Using this process, I was able to make a simple human rig. I used a Terminator T-800 Endoskeleton as a reference.
Rigging a Simple Human Armature
I started off with the pelvis area (blue arrow) and extruded the bone three other times; the second time to make a bone for the abdomen area (green arrow), the third bone for the upper chest (orange arrow) & one for the neck (red arrow).
I, then extruded the bone at the top joint of the upper chest bone to form a shoulder, i then extruded the joint sticking outwards and extruded the bone, down. This will form the upper-arm. I then extruded the outer joint of the upper arm to form the forearm.
Instead of repeating the same process again, I selected the shoulder, upper-arm & fore arm bones & duplicated it by pressing Shift + D. Next I right clicked and mirrored the arm to the X-Axis so it was facing the opposite direction and put it into place.
For the legs it was a bit different, firstly we extruded a bone from the pelvis bone, and still in edit mode I was able to move the bone to place it downwards making the thigh bone. I then extruded the thigh bone to form another bone for the lower leg/shin. I duplicated the leg by pressing Shift + D, Right Click > Mirror on to the X Axis and placed the other leg. In order for the legs of the rig to function properly, I've parented the top joint of both legs to the pelvis bone by clicking them & then shift clicking the pelvis bone and then doing Ctrl + P > Keep Offset. The feet were just a simple case of extruding the bones, outwards in a straight line. Here is my simple, human rig is complete.
I've made three extra copies of the rig so I can learn how to animate with them. First off was a walking animation.
For the walking animation, I've learnt about walk cycles and how they're animated. In order to learn and animate walk cycles. I've learnt about walk cycles in Richard Williams' Animator's Survival Guide. In the guide, animator, Richard Williams goes through how a human works & the many poses there are when making that first step.


Comments
Post a Comment